How To Setup OpenDNS on all your devices
Published
in Tutorials
on Dec 21, 2017
OpenDNS is a service which offers content filtering, protection against malware and performance boosts.
OpenDNS works by providing DNS servers for you to use on all your devices. You can read more about it on the OpenDNS website.
Setup on Windows 7, 8, 10
- On the start menu, type in 'control'. This will open the Control Panel.
- Click on 'Network and Sharing Center'.
- On the left sidebar, click on the 'Change adapter settings' option.
- Click on your primary network adapter, normally these could be called 'Ethernet' or 'WiFi' but they could be different depending on your computer.
- Right click on the adapter and select 'Properties'.
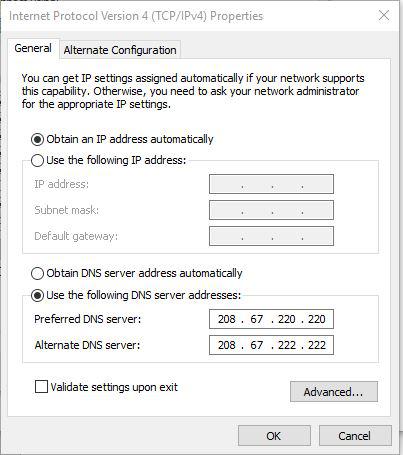
- In Properties open the settings for 'Internet Protocol Version 4'.
- Now, set your preferred DNS server as 208.67.220.220 and your alternate DNS server as 208.67.222.222.
- Now click OK. Your settings will then be saved and OpenDNS will be working on your computer.

Setup on Android
- Open the Settings on your Android device.
- Tap on the 'WiFi' page.
- Long press the WiFi network that you want to apply OpenDNS on. Tap on 'Modify network config'.
- Now tap on the 'Advanced' checkbox.
- Change the IP Settings from 'DHCP' to 'Static'.
- Now your device will fill out the settings.
- To change the DNS Servers, remove what your device has and complete it with the OpenDNS servers. Primary: 208.67.220.220 Secondary: 208.67.222.222.
- Now save your settings and OpenDNS will be in use on your Android device when it's connected to your chosen network.
Note: The above will need to be repeated for each network you want to use OpenDNS on.
Setup on iOS
- Open the Settings app on your iPhone, iPad or iPod.
- Tap the 'WiFi' page.
- Now choose the network you wish to configure OpenDNS on. Tap on it.
- Tap on 'DNS'.
- Now remove your previous DNS servers and replace them with the following. Primary: 208.67.220.220 Secondary: 208.67.222.222. You can separate the servers with commas.
- OpenDNS will now be configured for use when your iOS device is connected to your chosen network.
Note: The above will need to be repeated for each network you want to use OpenDNS on.
Setup on MacOS
- Open System Preferences.
- Click on 'Network'.
- Select the first connection in the list and click 'Advanced'.
- Select the DNS tab and add 208.67.222.222 and 208.67.220.220 to your DNS server list.
- Click OK
- Now OpenDNS is setup on your MacOS computer.
Setup on your router
- Navigate to the web interface of your router. You can usually access this through one of the following IP addresses. 192.168.0.1, 192.168.1.1, 192.168.2.1.
- Find where you can change your DNS settings.
- Change the DNS servers to the following: Primary- 208.67.222.222 Secondary- 208.67.220.220
- Now save your settings and reboot your router if required and you should be all set up with all devices on your network using OpenDNS.
Troubleshooting
- Sometimes when your IP address changes, you have to go and change your IP address on the OpenDNS dashboard. If you have a spare computer, you can setup the OpenDNS Updater program on your computer.